I worked in restaurants for many years, and I love to cook and to bake some too.
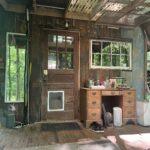
When I was designing my tiny house kitchen in a 12′ x 12′ house, I knew I wouldn’t have a lot of space, but I wanted to maximize the space that I had so I could enjoy preparing food.
Kitchen Size
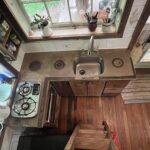
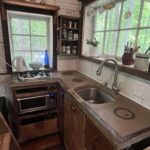
My kitchen counter was L shaped roughly 6.5 feet long by 2 feet deep. The shorter L portion of the counter included a 2-burner gas cooktop. I had an inset deep well stainless steel sink. That was 18 inches wide.
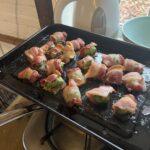
I was able to cook a wide variety of dishes from pancakes and scones to meatloaf and pasta dishes and more.
Here’s how I did it:
Cooking Logistics
- Deep Well Stainless Steel Sink – a great place to throw stuff as you’re working, as far as dirty utensils, or dirty pots and pans and dishes. Awesome for washing dishes in a tiny house as well to have the deep well.
- Two-burner gas cooktop. I think anyone who loves to cook prefers to cook on open flame rather than an electric stove. Much more control over the heat. Two burners for cooking for one person is definitely all I needed. Even when I have a guest or two, it’s plenty.
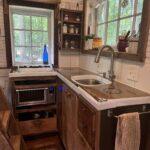
- Quality convection-type toaster oven. Underneath my two-burner gas cooktop, I had a shelf for a toaster oven that was billed as an air fryer but was really a convection oven. I was able to bake batches of granola, cookies, roasted vegetables, and anything else I wanted to cook on a tray or in a pan, like meatloaf. Also great for reheating things.
- I had a small space on one side of the sink, probably just 18 inches. On the other side of the sink, I had a workspace of 36 inches or so. Just enough to be able to chop and have multiple bowls going if I needed them or appliances on the counter.
- What countertop appliances did I use? Blender and food processor and electric tea kettle. And that’s about it. My electric tea kettle had a home on my deep window well, so it wasn’t taking up counter space.
- The only item that took up permanent counter space on my countertop was a small compost container in the inside corner where it didn’t get in my way.
- Crock-Pot- I occasionally did soups or slow-cooked dishes in a crock pot, which I put on my back porch. No reason to use up valuable counter space for this.
- Grill- I have had a couple of outdoor grills, but haven’t used them much. In North Carolina, a grill is an option for 9 months out of the year, 12 months if you don’t mind some cold. If you like to grill, it’s a great option, especially in Summer- you’ll keep some cooking heat out of the tiny house.
Storage
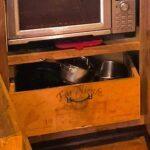
- Pots and pans were in a drawer beneath the toaster oven made from a wooden Far Niente wine crate from the 1990s*.
*I was bar manager at The Lobster in Santa Monica back then and had plenty of cool crates to choose from. This particular crate I brought home and made into a Barbie storage for my daughter when she was about 4. It had faded scribbles and hearts she had drawn on it with her Crayola markers. This made me happy every time I got out pots to cook with.
- My few sheet pans were in a slot above the toaster oven
- Extra pantry-type items were either on top of the fridge or in a cabinet to the left of the sink that went the depth of the corner of the counter
- Drawers below the counter on the right-hand side. Stored miscellaneous kitchen utensils, dish towels, my vitamins and supplements
- Spice rack mounted to the wall
- Jars on a shelf over the sink for teas and nuts.
- A couple of bigger chef’s knives were on tiny magnets on the window well.
- I had containers for silverware and kitchen utensils on my deep window well above the sink.
- On my back porch, I had an antique desk that I salvaged at Habitat for overflow of things like vitamins and herbs and teas and dry goods.
- Since I had a full-sized refrigerator, even things that didn’t need to be refrigerated, I would put it in the fridge just to use it as extra storage space. Things like:
- Almond flour
- Flaxseed meal
- Things in jars that didn’t necessarily need to be refrigerated.
- I made open storage for my plates because I like that look in a kitchen. A shelf above the window with little wood strips to keep plates from sliding. My cups run cup hooks hanging in the window well.
And that’s how I designed a fully functional, high-output tiny house kitchen!
Drop your questions or comments, or share your tiny house kitchen photos in the comments.
Want more tiny house resources?
Subscribe for weekly posts on tiny house living, simple living tips, and country lifestyle.
Plus, follow along on the Mark Cool: Outside the Box Life Podcast where I share 8 years of lessons from 144 square feet. On Spotify, Youtube, itunes
Get my complete Tiny House Guide (coming soon!) at stan.store/markcool – everything from budget builds to design hacks based on building multiple tiny houses from full DIY to turnkey.
Need Help With Your Tiny House Project? Book a 1-on-1 tiny house design consultation for $299 at stan.store/markcool. Finding a piece of land, budgeting, logistics, design, material sourcing, moving a tiny house, or problem-solving your specific build challenges.